Including lettering in your hand embroidery is a super practical skill to develop on your stitching journey. Particularly if you’d like to work on more of your own embroidery projects or patterns, confidently and creatively stitching letters will enable you to customize your embroidery in lots of fun ways.
Where can you use lettering in hand embroidery projects?
Whether you are creating for yourself or gifting your embroidery, personalizing your stitching will make it that much more meaningful and treasured. Here are just a few ideas where you can include stitched lettering:
Milestones such as birth announcements or wedding announcements
Personalized decor, such as pillows, Christmas stockings, or ornaments
Inspirational quotes
Scripture
Monogrammed items, like bags, blankets, or handkerchiefs
Word of the year
Fun phrases on shirts, hats, or onesies
Song lyrics
Handmade cards
ABC quilt or ABC wall art for a child’s room
Holiday greetings
Plus much more!

How to Choose Lettering for Hand Embroidery
Incorporating lettering into your hand embroidery can be as simple as using your own handwriting and stitching over it, or as involved as printing letters in different fonts from your computer and transferring them onto fabric.
Printing letters from your computer and stitching them can be a great way to experiment with how different fonts have different personalities. Some fonts look casual and fun, while others are fancy and elegant. Some fonts are stately, and others are bold. When selecting lettering, pay attention to the feeling you want to convey or communicate. Lettering for children’s wall art might be more playful and whimsical whereas lettering for a man’s handkerchief might be angular or masculine.
A note on fonts: Fonts on your computer are generally available for use in whatever personal projects you’d like. So, for example, if you are stitching a personalized onesie for your new baby, or even another person’s new baby, tracing letters for stitching the name is ok. However, if you start selling patterns that use specific fonts, you will need to check the licenses of the fonts you use to make sure they legally allow you to be able to sell them as part of a pattern.

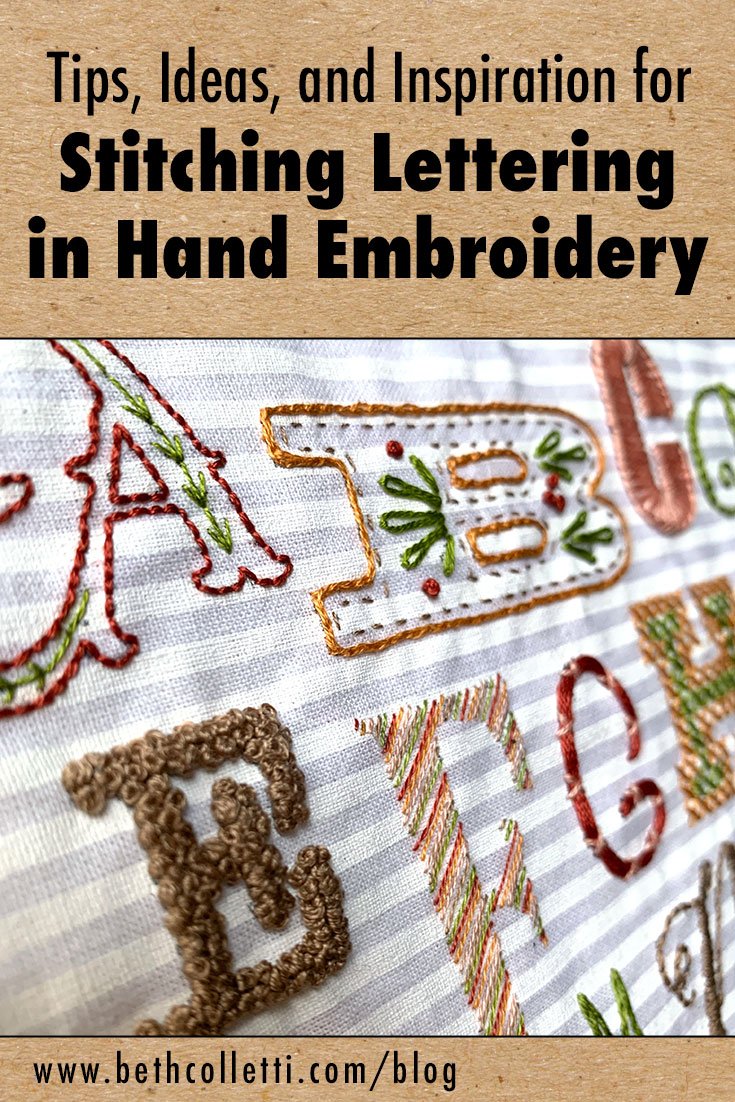
Tips for Stitching Lettering
The simpler your letters are, the more elaborate your stitches can be. Conversely, the more elaborate your letters are, the simpler your stitches should be.
If you want to use a font that has very complex letters, feel free to modify the letters so that they are simpler to stitch.
Avoid using elaborate letters (or stitches) at a small size. It can result in the lettering being too difficult to read, or too difficult to stitch cleanly.
Try stitches that can mimic a letter, such as the fly stitch for a V or a Y, the cross stitch for an X, and the french knot to dot a letter i
The back stitch is a great overall stitch, especially for small letters. It’s also useful both for outlining bold letters or stitching over thin letters.
Script or cursive letters look great in a wide variety of line stitches.
Bold letters or block letters are great to use with a variety of fill stitches, textures or decorative patterns.

Looking for more ideas and inspiration for creatively stitching letters A-Z?
Ready to dive into stitching lettering, but aren’t sure where to start? Then join me for my Alphabet Sampler Mini-Course!
Over the course of five weeks you’ll stitch a few letters each week. You’ll have the opportunity to stitch each letter with different fill and line stitches while creating varying textures and using different techniques. You’ll use at least 15 different stitches throughout the sampler, including many basic ones featured on my video page, but also some bonus stitches that might be new to you!
Concerned about having the time to participate? Each week you can spend just a few hours on the project. Stitch each week’s letters all at once, or embroider each letter on a different day. Some letters will be quick to stitch and others will take more time. The sampler instructions and resources will remain available to you even after the five weeks are past in case you aren’t able to finish during the allotted timeline.
Ready to get more info and jump in? Visit the Alphabet Sampler Mini-Course page to enroll and gather your supplies! Have more questions? Send me an email and I’d be happy to help!
